Lighting Styles

www.lightingstyles.co.uk
01780 767 617

Track Lighting - Design, Advice & Ideas

Track lighting is very popular as it offers a smart solution to illumination a space, especially if the space is large or not suitable for a ceiling light. With the multiple and continually updated choices we provide, which consist of 12v, mains and wire track systems there should be something to suit your specific needs.  Our design guides, advice and tips throughout the page and below will help you with your design.
 
If you require assistance to complete all you need to purchase for an installation call our technical support team, who will suggest the most appropriate products, systems and solutions to suit your specific needs. Call on 01780 767617.
Filter results by colour, IP rating etc...

Contemporary Track Lighting For The Home

Contemporary Track Lighting For The Home

Track lighting or rail lighting, has long been popular in shops, showrooms, galleries and museums, offering an efficient and adjustable lighting system. Cosmetically though it’s always been a bit too industrial for most homes. That’s why we’re so excited about our new ranges of track lighting systems designed especially for the home, these have been completely overhauled to be sleeker, easier to use and available in a range of colours and finishes.

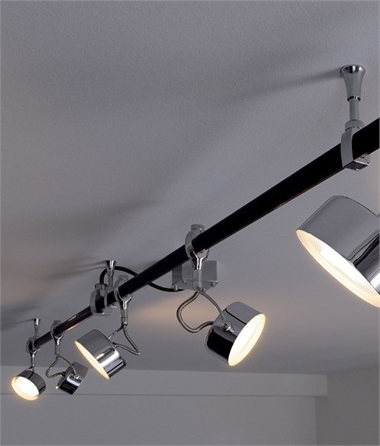
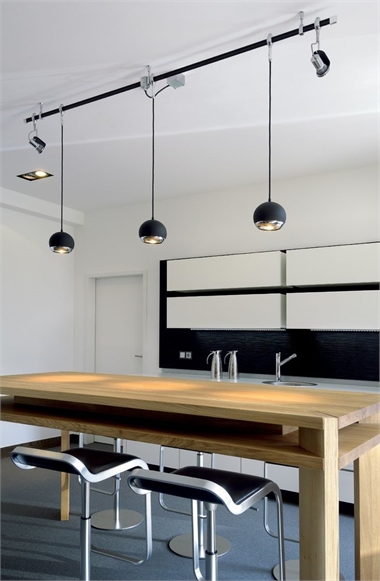
We now often see track used in high-end kitchens, home gyms, even entire homes, opening up the benefits of these modern systems to interior designers and home owners. The main benefit of track lighting is the ability to move light heads anywhere along it with ease, add and remove lights, and offer an installation that gives you loads of light fixtures without the need to drill huge holes in the ceiling that would be necessary with the same amount of downlights.

Moving and adding lights is usually as simple as turning a small thumbscrew, and due to the guarded electrical connections in the track this is completely safe and easy, no wiring needed.

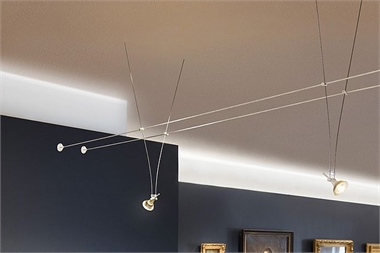
Installation-wise track is really useful, it can span between two points, for example an atrium or portion of raised ceiling, some tracks can even be suspended to provide lower level lighting in high ceiling rooms. For normal architectural situations though you’re just as wise to use track lighting, the rails used need very few supports and installed with just a single screw means  minimal holes in your ceiling as well as a faster installation.

Track lighting offers a clean, minimalist look that can be completely customised to your space. Teamed with its ease of use for both installer and home owner this really does offer the most flexible lighting solution today.

Our lighting experts are always on hand if you need advice on what track is best for you, installation queries, even checking you have all the components you need.

How to install Tension Wire

How to install Tension Wire

Basic Guide Installation Instructions

1. Firstly fix a wall bracket in place at your desired height.

2. Fix a second wall bracket to the same wall (spaced to suit your lamp holder – simply slide the tapping screws on the lamp holder in or out to suit your design and space the wall bracket the same distance apart).

3. Extend the wall brackets to their longest length.

4. Insert the end of the tension wire and clamp in place with grub screws.

5. Fix two wall bracket on the opposite wall at the same height and same horizontal spacing.

6. Pull over a length of the tension wire until taut from one wall to the other. Cut this to suit the length of your lighting run.

7. Insert the end into the wall bracket and tighten grub screws (the wire should be fairly taut but with a little sag).

8. Tighten up the wall brackets until the wire is under tension. If the wire does not make a low note when plucked it is not tight enough!

If you use all available adjustment on the tensioner – remove the wire, cut shorter and start again.

9. Repeat the wire tensioning for the second wire.

10. You should now have two taut wires spaced to suit your lamp holders.

11. Install the lamp holders. The tapping screws on the lamp holder need to pierce the outer insulation to connect to the current. Do not over tighten as this may break the wire. Install lamps.

12. Fix the transformer in place and cut two lengths of the remaining tension wire to make power leads. Fix the end of your power leads to the feed-in clamps (note the power leads are fixed in pace with the smaller grub screws).

13. Remove the pointed slotted screw at the end. Put the feed-in on the tension wires – one to each tension wire, fit the slotted tapping screws and tighten until the point pierces the insulation.

14. Connect the free end of the power lead to the transformer.

15. Connect the mains supply to the transformer and switch on. If installed correctly everything should work. Shake the system lightly to see if any lamps flicker – if there is flickering tighten the tapping screws on that lamp holder. If all lamps flicker tighten the tapping on the power feeds.

Why choose track lighting?

Why choose track lighting?

Track lighting or tension wire lighting is a continuous track device on which two or more lamps can be attached anywhere on the device which contains electrical conductors.  This is especially good if you have a wide span or difficult space you wish to illuminate and is an alternative to the more normal routing of electrical wiring to individual positions, i.e. a single ceiling point.

Having a track or wire system allows you to add several different styles of lamps if you wish, such as hanging pendants or adjustable spots.  This gives you flexibility especially if used in a kitchen, you could have a pendant over a breakfast island for example and the spots aimed at the counter tops.

Choosing track lighting can be a tricky task as there are lots of things to consider, low voltage or mains, how much wire/track is required, what wattage transformer, how many fittings and more importantly will it work in the space you have.

If you are unsure call Lighting Styles sales team and they can give you all the advice you require plus help you choose all the items you need for installation.  We would also recommend you hiring an experienced electrician for installation as these can be tricky if you have limited wiring experience.

Adjustable Cube Spotlight for Single Circuit Track

Adjustable Cube Spotlight for Single Circuit Track

3 Options
£102.50
Black, White or Grey for GU10 Lamp
Mains Track Pack with GU10 LED Lamps Supplied

Mains Track Pack with GU10 LED Lamps Supplied

7 Options
£177.00
Offered in White, Black and Silver Grey Finishes
Eyeball Spotlight for Single Circuit Track

Eyeball Spotlight for Single Circuit Track

4 Options
£97.00
Available in Four Finishes
3 Light Ready to Install Track Kit - Bullet Design Spotlights

3 Light Ready to Install Track Kit - Bullet Design Spotlights

6 Options
£82.40
Adjustable Lamp Heads - 1000mm Length
Bullet Track Spotlight for GU10 Mains Lamps

Bullet Track Spotlight for GU10 Mains Lamps

3 Options
£19.00
Available in Satin Nickel, White or Black
Bracket GU10 Spotlight for Single Circuit Track

Bracket GU10 Spotlight for Single Circuit Track

2 Options
£77.00
A Reduced Glare Spotlight - Accommodates Longer GU10 Bulbs
Advanced Track Pendant Light-Eye Chrome
  • Sale
  • 30% OFF

Advanced Track Pendant Light-Eye Chrome

 
£70.00
In Stock for Quick Dispatch

With the endless configurations possible there will always be several ways to lighting a room with track systems. We suggest our clients first think where they would like to have lights positioned and then decide whether to use spotlights or pendants. Once these design principals have been decided you can then either search for a track solution to suit your needs, or call us for free design assistance.